Exploring IAM (Azure)
As a cloud professional, you may already be familiar with Azure Identity and Access Management (IAM) architecture and have experience in following some of their best practices. In terms of IAM, some of the general concerns are as follows:
- What are the best ways to manage access to resources?
- How can you give users access to only the resources that they actually need?
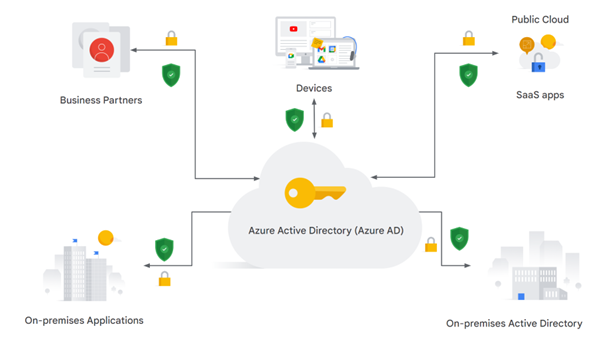
In Azure, your organization uses a combination of IAM, Azure Active Directory (Azure AD), users, and roles with attached policies to control access to the different Azure accounts.
Azure AD is a multi-tenant cloud-based directory and identity management service that provides access control and management for Azure resources.
Now you will explore how you would implement IAM control in Google Cloud.
Overview
In this lab, you learn how to use the Service Account User role and how to grant roles.
Objectives
In this lab, you learn how to perform the following tasks:
Use IAM to implement access control
Restrict access to specific features or resources
Use the Service Account User role
Lab setup
For each lab, you get a new Google Cloud project and set of resources for a fixed time at no cost.
Sign in to Qwiklabs using an incognito window.
Note the lab's access time (for example,
1:15:00), and make sure you can finish within that time.
There is no pause feature. You can restart if needed, but you have to start at the beginning.When ready, click Start lab.
Note your lab credentials (Username and Password). You will use them to sign in to the Google Cloud Console.
Click Open Google Console.
Click Use another account and copy/paste credentials for this lab into the prompts.
If you use other credentials, you'll receive errors or incur charges.Accept the terms and skip the recovery resource page.
Task 1. Setup for two users
Sign in to the Cloud Console as the first user
This lab provisions you with two user names available in the Connection Details dialog. Sign in to the Cloud Console in an Incognito window as usual with the Username 1 provided in Qwiklabs. Note that both user names use the same single password.
Sign in to the Cloud Console as the second user
- Open another tab in your incognito window.
- Browse to console.cloud.google.com.
- Click on the user icon in the top-right corner of the screen, and then click Add account.
- Sign in to the Cloud Console with the Username 2 provided in Qwiklabs.
Task 2. Explore the IAM console
Make sure you are on the Username 1 Cloud Console tab.
Navigate to the IAM console and explore roles
- On the Navigation menu (
), click IAM & admin > IAM.
- Click Grant Access and explore the roles in the drop-down menu. Note the various roles associated with each resource by navigating the Roles menu.
- Click CANCEL.
- Switch to the Username 2 Cloud Console tab.
- On the Navigation menu (
Switch back to the Username 1 Cloud Console tab.
In the IAM console, for Username 2, click on the pencil icon. Username 2 currently has the Viewer role. Do not change the Project Role.
Click CANCEL.
Task 3. Prepare a resource for access testing
Create a bucket and upload a sample file
Switch to the Username 1 Cloud Console tab if you aren't already there.
On the Navigation menu (
Click +Create.
Specify the following, and leave the remaining settings as their defaults:
| Property | Value (type value or select option as specified) |
|---|---|
| Name | Enter a globally unique name |
| Location type | Multi-region |
- Click CREATE.
- Click UPLOAD FILES.
- Upload any sample file from your local machine.
- When the file has been uploaded, click on the three dots at the end of the line containing the file, and click Rename.
- Rename the file to sample.txt, and click RENAME.
Click Check my progress to verify the objective.
Verify project viewer access
Switch to the Username 2 Cloud Console tab.
In the Console, navigate to Navigation menu > Cloud Storage > Buckets.
Verify that Username 2 can see the bucket.
Task 4. Remove project access
Remove Project Viewer role for Username 2
- Switch to the Username 1 Cloud Console tab.
- On the Navigation menu (
- Select Username 2 and click Remove Access.
- Confirm by clicking CONFIRM.
Notice that the user has disappeared from the list! The user has no access now.
Click Check my progress to verify the objective.
Verify that Username 2 has lost access
Switch to the Username 2 Cloud Console tab.
On the Navigation menu (
On the Navigation menu (
Task 5. Add storage access
Add storage permissions
- Copy the value of Username 2 from the Qwiklabs Connection Details dialog.
- Switch to the Username 1 Cloud Console tab.
- On the Navigation menu (
- Click Grant Access to add the user.
- For New principals, paste the Username 2 value you copied from the Qwiklabs Connection Details dialog.
- For Select a role, select Cloud Storage > Storage Object Viewer.
- Click SAVE.
Click Check my progress to verify the objective.
Verify that Username 2 has storage access
- Switch to the Username 2 Cloud Console tab.
To start Cloud Shell, click Activate Cloud Shell (
). If prompted, click Continue.
To view the contents of the bucket you created earlier, run the following command, replacing
[YOUR_BUCKET_NAME]with the unique name of the Cloud Storage bucket you created:
As you can see, Username 2 has limited access to Cloud Storage.
Close the Username 2 Cloud Console tab. The rest of the lab is performed on the Username 1 Cloud Console tab.
Switch to the Username 1 Cloud Console tab.
Task 6. Set up the Service Account User
In this part of the lab, you assign narrow permissions to service accounts and learn how to use the Service Account User role.
Create a service account
On the Navigation menu (
Click + CREATE SERVICE ACCOUNT.
Specify the Service account name as read-bucket-objects .
Click CREATE AND CONTINUE.
For Select a role, select Cloud Storage > Storage Object Viewer .
Click CONTINUE.
Click DONE.
Add the user to the service account
- Select the read-bucket-objects service account.
- Click on the three dots to the right of the service account name. Then click on Manage permissions
- Click on the GRANT ACCESS button. Specify the following, and leave the remaining settings as their defaults:
| Property | Value (type value or select option as specified) |
|---|---|
| New principals | altostrat.com |
| Role | Service Accounts > Service Account User |
Click SAVE.
Grant Compute Engine access
You now give the entire organization at Altostrat the Compute Engine Admin role.
- On the Navigation menu (
- Click Grant Access.
- Specify the following, and leave the remaining settings as their defaults:
| Property | Value (type value or select option as specified) |
|---|---|
| New principals | altostrat.com |
| Select a role | Compute Engine > Compute Instance Admin (v1) |
- Click SAVE.
Create a VM with the Service Account User
- On the Navigation menu (
- Click CREATE INSTANCE.
- Specify the following, and leave the remaining settings as their defaults:
| Property | Value (type value or select option as specified) |
|---|---|
| Name | demoiam |
| Region | Lab Region |
| Zone | Lab Zone |
| Series | E2 |
| Machine Type | e2-micro (2 vCPU, 1 GB memory) |
| Boot disk | Debian GNU/Linux 11 (bullseye) |
| Service account | read-bucket-objects |
- Click Create.
Click Check my progress to verify the objective.
Task 7. Explore the Service Account User role
At this point, you might have the user test access by connecting via SSH to the VM and performing the next actions. As the owner of the project, you already possess the Service Account User role. So you can simulate what the user would experience by just using SSH to access the VM from the Cloud Console.
The actions you perform and results will be the same as if you were the target user.
Use the Service Account User
For demoiam, click SSH to launch a terminal and connect.
Run the following command:
Result (example output):
What happened? Why?
Copy the sample.txt file from the bucket you created earlier. Note that the trailing period is part of the command below. It means copy to "this location":
Result (example output):
To rename the file you copied, run the following command:
To copy the renamed file back to the bucket, run the following command:
Result (example output):
On the Navigation menu (
Browse the list for the lines with read-bucket-objects, click on the pencil icon. read-bucket-objects currently has the Storage Object Viewer role. Alter the Role to Cloud Storage > Storage Object Creator .
Click Save
Return to the SSH window for demoiam
To copy the renamed file back to the bucket, run the following command:
This time the command succeeds as the service account has the correct permissions.
Task 8. Review
In this lab you exercised granting and revoking IAM roles, first to a user, Username 2, and then to a Service Account User. You could allocate Service Account User credentials and "bake" them into a VM to create specific-purpose authorized bastion hosts.
Summary
In both Azure and Google Cloud, IAM is a web service that can help you securely control access to different services and resources. You can use this tool to manage authentication (Who has access?) and authorization (What can they do?).
You can also create and manage different principals such as the following:
- Users
- Roles
- Policies
Google Cloud IAM and Azure AD have many similarities in how they operate. Both systems provide a range of features such as role-based access control, multi-factor authentication, and user management that make it easy to secure your cloud infrastructure. You have the ability to delegate administrative tasks and control access to the resources with granular policies in both systems.
There are some differences as well. Google Cloud IAM uses an intuitive and straightforward user interface. Azure AD uses features such as conditional access and integrated single sign-on with other applications.

.png)


No comments:
Post a Comment